
How to add a realistic fringe to a dollhouse needlepoint carpet
ONLINE MINIATURE NEEDLEPOINT EMBROIDERY TUTORIALS
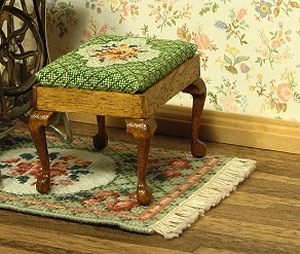
‘Real’ carpets often have fringed ends. This is a way of decoratively tying the ends of the warp threads after a carpet has been cut from the loom, but it can easily be simulated on miniature needlepoint carpets for doll’s houses as well.
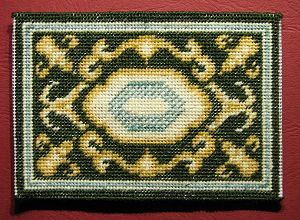
For your miniature version, hem the two long sides of the carpet by referring to the How to Hem Dollshouse Carpets Tutorial first. The two short sides can then be dealt with using fringing stitch.
All ‘suitable’ Janet Granger doll’s house carpet kits (i.e. not the staircarpets, for instance!) contain thin cotton thread to use for the fringing, in a neutral shade, to look as realistic as possible. Fringing stitch is ‘greedy’, thread-wise: you will find that you use approximately one yard of cotton for every inch of fringing (or one metre for every 2.5cm), so generous amounts are included in each kit. Cotton, being thinner than wool, gives a flatter, more realistic look to the fringe.

Fringing stitch is similar to a cross stitch with a loop included. It looks more complicated than it actually is, so it is definitely worth having a go! Follow the photos here to see what you need to do.
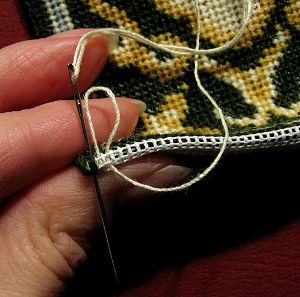
Start by threading your needle with about three feet of fringing thread. Secure the end by knotting it and running the needle through a few stitches on the back of the main carpet design. Hold the canvas with the main stitched area facing upward, the unworked border of canvas folded under and secured in place by the hemming stitches on the two long sides, and the row of holes that you are going to work the loops along held horizontally in front of you.
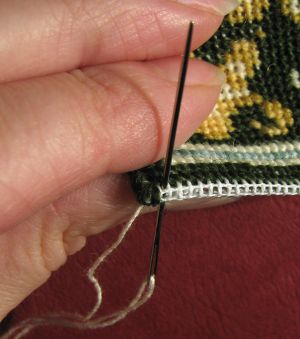
Bring the needle up ready to work the first stitch in the second to last hole from the left hand edge. The FIRST hole along this edge should already have a wool overcast stitch in it, completing the adjacent side of the carpet’s hem. (Remember that, for all the fringing stitches, you will be working through TWO LAYERS of canvas, but as the holes should be aligned in pairs, they will be referred to here as if they were one layer.) Pull the thread all the way through.
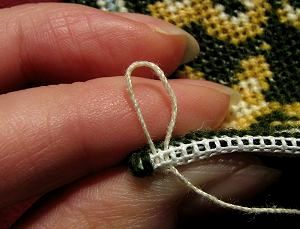
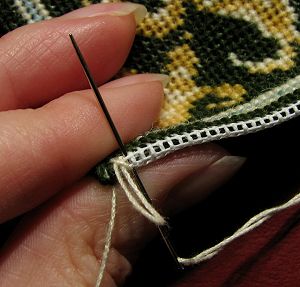
Take the needle down though the third hole from the left hand edge, but this time, leave a loop about half an inch long (this size is not crucial, as you will later trim the loops to equal lengths of fringe). If you place a lollipop stick or a pencil in the loops as you make them, they will all be roughly the same size when completed.
To hold this loop securely, take the thread from right to left behind the loop you’ve just made, and then take the needle down through the first hole from the left hand edge.

Slowly pull the thread through until it lies flat and taut, making a long slanting stitch which traps the loop in place. It may help as you are pulling the thread through, to lay the loop down facing forwards (towards you) and tease the slanting stitch into position with the first finger of your left hand.
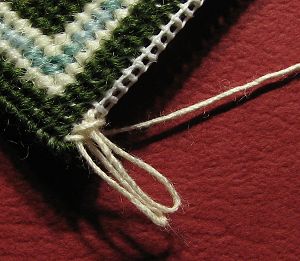
Bring the needle up again in the third hole from the left hand edge (this hole already has a stitch in it), ready to make the next stitch.
Continue in this manner along the whole length. It is quite rhythmical once you get the hang of it!
Think of the needle movement as ‘up, down leaving a loop, DOWN’ – it’s the third movement (the laying of the long slanting stitch to the left that holds the loop in place) that tends to catch people out.
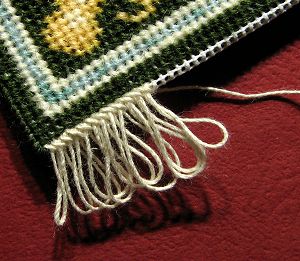
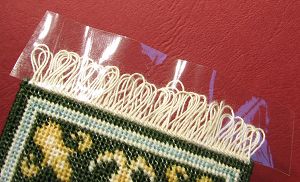
Prepare to cut the loops when the whole length is finished by smoothing out the loops, placing the carpet on a flat surface such as a table, and temporarily placing Sellotape along the whole length.

This will keep stray loops from bending away from the scissors as you carefully cut along the fringe and Sellotape together, trimming the loops into individual strands in the process.
After trimming the fringe, remove the Sellotape and then iron the fringe so that it is completely smooth and flat. If a few cut strands are uneven, trim them to length now.
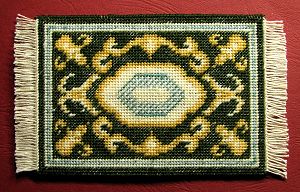
Your miniature doll’s house carpet is now finished, set off by a wonderfully realistic fringe!
Why not visit our Needlepoint Kit Store, to choose from dozens of miniature needlepoint carpet designs?

“Sarah”

“Barbara, green”

“Judith”