
How to hem dollhouse needlepoint carpets
ONLINE MINIATURE NEEDLEPOINT EMBROIDERY TUTORIALS
")
Hemming your miniature needlepoint carpet serves two functions: it gives a neat appearance to the edge, and keeps the unworked canvas securely folded to the back of the work.

This tutorial will show you how to hem miniature needlepoint rectangular carpets with a plain hem for all four sides, as well as how to hem just two sides prior to adding a fringe on the two shorter ones (see the ‘How to add a fringe to your doll’s house carpet’ tutorial for a great technique for adding this finishing touch). Round and oval carpet hemming techniques are covered next, and finally a method for finishing the unique Janet Granger doll’s house needlepoint tiger-skin rug.
Starting and ending each length of wool.
The hemming is done using a double length of crewel (2-ply) wool. First of all, to start each length of wool, thread the needle with one length about 30 inches long, double it over and knot the ends together and run a few stitches through the back of the work near where you want to begin hemming, to secure. Starting mid-way along a side is best, when possible. When you need to finish off the length, do it in a similar way, with a few stitches through the backs of tent and basketweave stitches in the main body of the design. Hemming like this will hold the unworked canvas securely to the back.
How to hem rectangular-shaped doll’s house needlepoint carpets
Most of the carpets in my range are rectangular, and these are the easiest to deal with. These instructions will first cover how to hem all four sides (that is, for when you choose not to add a fringe, or when it is unsuitable to have a fringe – such as on the staircarpets).
How to hem all four sides

Trim the canvas so that there is an unworked border of half an inch all the way round the miniature carpet.

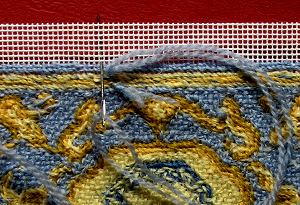
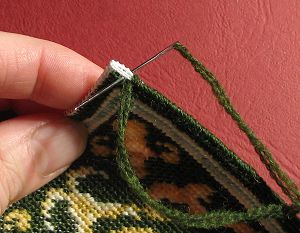
Starting half way along one side, with the right side of the stitching facing you, turn the unworked canvas under (i.e. away from you) so that the first row of ’empty’ holes is along the edge of the carpet,
and then oversew with a double thickness of wool in the needle, in the same shade as the final row of stitches. Make sure that each stitch begins in the same hole as the outermost line of tent stitches, and that the needle goes vertically through the two layers each time. This will give you the neatest edge.

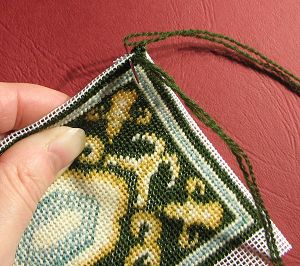
As you approach a corner (about three-quarters of an inch away), carefully fold down the adjoining edge

and oversew around the corner through the two thicknesses, working the very end stitches twice through the same hole to make sure that the bare canvas is properly covered.

If, as you approach the corner, you have less than 8 inches of wool left in the needle, finish off and start a new length now, as starting a new length just as you are stitching around the corner is tricky.
How to hem two sides, in order to prepare a miniature rectangular carpet for adding a fringe
If you choose to add a fringe to your rectangular miniature carpet, you will trim the canvas to half an inch all round as described above, but then you only need to hem the two long sides. In the process of hemming these two long sides of your carpet, you will need to fold in and catch down the adjacent short sides’ unworked border in the first few and last few stitches that you make, so that the two short sides have their unworked canvas held down securely at each end.
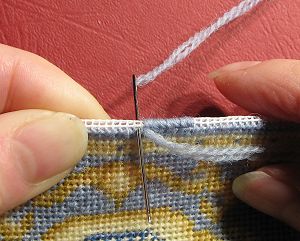
To do this, you need to start at the extreme right hand end of a long side, with the right side of the stitching facing you. Fold under the unworked border of the long side first (away from you), and then the unworked border of the short side (this is the side that you not going to hem now, but which will have the fringe on, later). With your first few stitches, catch down both layers.
As you reach the other end of the long side with your hemming stitches, do the same again, and catch in the other short side’s unworked border.

At both ends of your line of oversewing, work two stitches through the final hole, to ensure that the final canvas corner is properly covered over with the wool. You do not hem the edge that you will be working fringing stitch along.
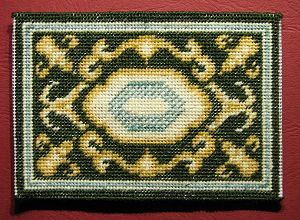
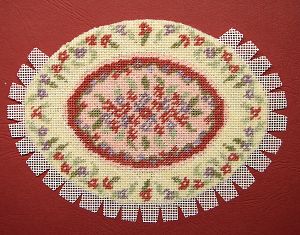
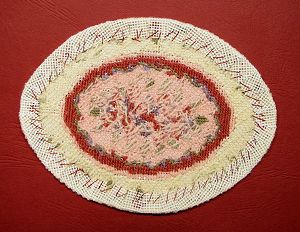
When the two long sides have been hemmed, and the two short sides are ready for you to work fringing stitch along, your carpet should look like this.
>> Tutorial:
‘How to add a fringe to your doll’s house carpet’

How to hem irregularly-shaped doll’s house needlepoint carpets
Round and irregularly-shaped carpets cannot be hemmed in the way outlined above because the edge of the needlepoint stitching does not run evenly along a row of holes.
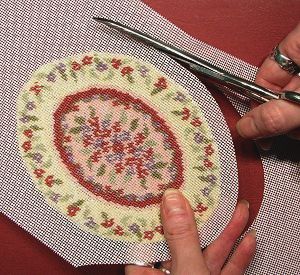
To finish these, then, trim the canvas as usual (to about half an inch all round).
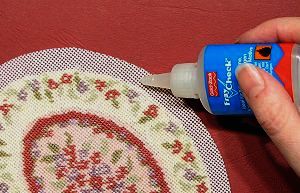
Spread fabric glue over all the unworked canvas and allow to dry thoroughly, to prevent fraying.
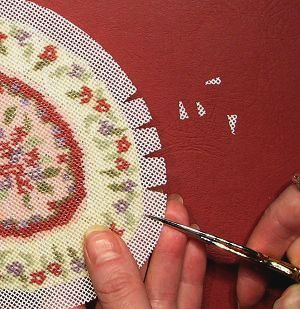
Then, referring to the diagram at right, snip the bare canvas up to the stitching at intervals of about half an inch around concave curves, and cut V-shapes out along convex ones. Dab fabric glue along the cuts again if necessary to prevent unravelling, and leave to dry thoroughly.
Fold each ‘tab’ to the reverse side, leaving no bare canvas showing from the front or edge.
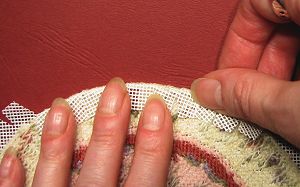
Run your nail along the edge to press each tab into position…
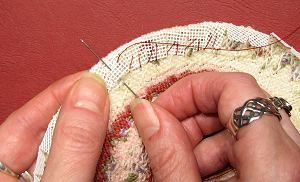
then secure them in place with a couple of stitches for each one, using strong sewing thread in a neutral shade (not supplied in the kit). Please note that for clarity in these photos, I used a strong shade instead.
Make sure that your stitches only catch a few fibres of the reverse of your needlepoint stitches each time, and do not show through to the front. Do small sections at a time to achieve a smooth outline.

How to hem an unusual shape:

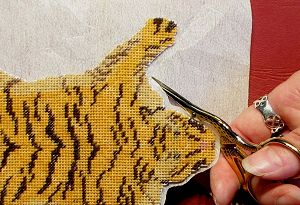
The method for a carpet as oddly shaped as the tiger-skin design is different again.

After all the stitching is completed, run a good line of fabric glue around the outer couple of rows of stitching, and onto the unworked canvas for about a quarter of an inch as well. Leave to dry thoroughly.
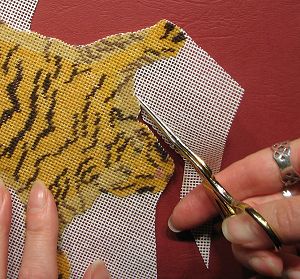
Then, with a sharp pair of scissors, carefully cut away all the bare canvas right up to the stitching You will need to be feeling brave to do this, but the glue will work, and the tight curves (around the paws of the tiger, for instance) will end up being very flat and neat if dealt with in this way. Be careful that you do not snip any of your stitches.
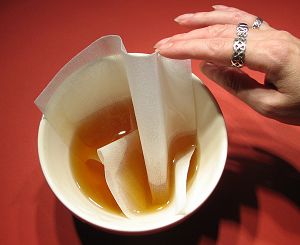
To simulate the skin of the tiger, you will need to dye the piece of interfacing included in the kit. This is supplied as a white fabric, so to dye it to the beige shade that you need, pour some freshly brewed tea into a bowl. Dip the fabric into the tea for about a minute until it has absorbed the colour sufficiently, take it out, lay it flat on some clean paper and leave to dry completely.

Then run a generous band of contact adhesive such as UHU around the edge of the stitched carpet on the reverse side, and also dot it over the underside of the main body area.
Place the carpet onto the interfacing and press together firmly. Once the glue has dried, trim away the excess interfacing so that it only just shows around the edge of the stitching (about an eighth of an inch looks right), and looks just like ‘skin’.

Now that you have learnt how to hem all kinds of miniature carpets, why not look through the designs that are available in our Needlepoint Kit Store. Choose any one of our dozens of carpet designs to enhance your doll’s house, such as one of these:
“Blue bathmat”

“Judith”
“Kate, oval, pink”

“Tigerskin rug”